
Temenos Lifecycle Management Suite - Origination Product Guide
Loan Funding Panel
| Administrator Guide > Virtual Capture Overview > Virtual Capture Screens > Field and Panel Configuration Examples > Loan Funding Panel |
The Loan Funding panel provides users the ability to set a loan application's funding type.
The Loan Funding panel can be configured to appear within an Application type screen in System Management > Origination > Virtual Capture > Screens.
To begin configuring a Loan Funding panel:
 within the Edit Screen window.
 .
.| Attribute | Description | ||||
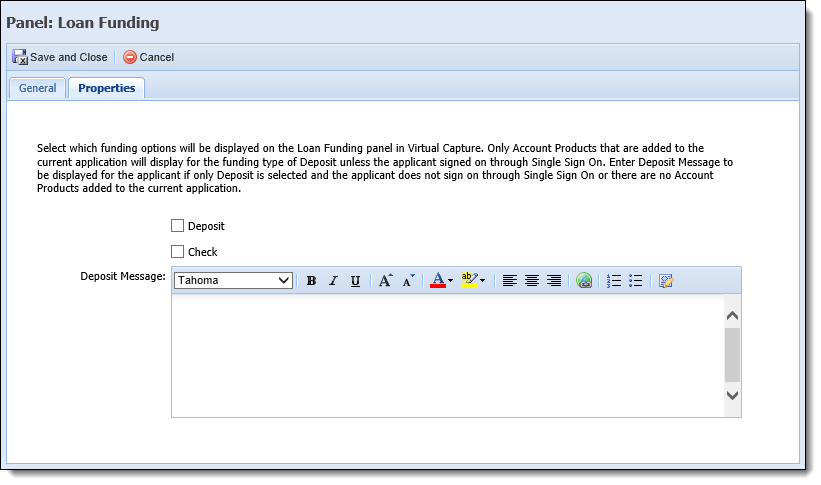
| Deposit |
Select this check box to enable Deposit as a funding option within the Loan Funding panel.
|
||||
| Check | Select this check box to enable Check as a funding option within the Loan Funding panel. | ||||
| Deposit Message |
Enter the message that displays to applicants, when Deposit is selected as the funding type. The Deposit Message allows institutions to inform applicants why no accounts are available to deposit loan proceeds in.
|
 to continue defining the Application screen attributes.
If no funding options are selected within the Properties tab, an error message informs the administrator that at least one funding payment option must be selected.
to retain the screen settings.Once saved, the screen including the Loan Funding panel must be assigned to a Virtual Capture Workflow Model. The workflow model must then be assigned to a loan application type within the General tab of the Virtual Capture Products page.
 |
For information on assigning Virtual Capture Workflow Models, please see the Virtual Capture Products topic in this guide. |
When the Loan Funding panel renders in Virtual Capture, applicants are able to allocate loan proceeds as well as view a funding summary of the loan's proceeds.
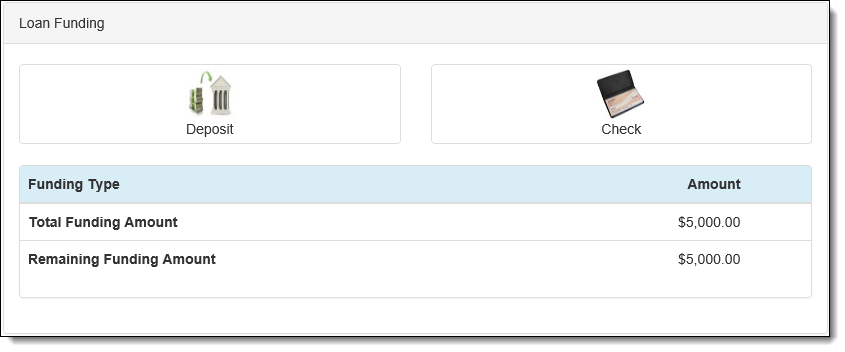
At the top of the panel, the following buttons may be available depending on the administrator’s configuration of the panel:
|
The Loan Funding panel may only display one funding option, depending on the panel's configuration within System Management > Origination > Virtual Capture > Screens. |
| Button | Description | ||||
 |
Allows a user to allocate loan proceeds to a core account or an account related to the current application. Upon clicking this button, the Edit Loan Funding - Deposit pop-up window opens, and applicants are able to fund the loan using a core account.
|
||||
 |
Allows a user to allocate loan proceeds with a check issued by the financial institution. Upon clicking this button, the Edit Loan Funding - Check pop-up window opens, and applicants are able to fund the loan by check.
|
The Loan Funding panel also tracks loan funding amounts within the Loan Funding Summary grid. This grid allows users to view the current allocations as well as the remaining funds to be allocated.
The Loan Funding Summary grid contains the following columns:
| Column | Description | ||||||||||||
| Funding Type |
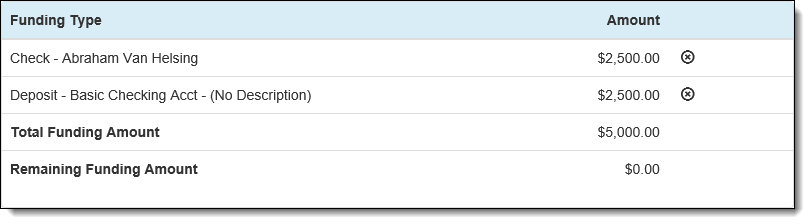
The information displayed in the Funding Type column varies based on the funding option selected by the applicant:
In addition to the loan proceed allocations, the Funding Type column includes two standard rows that display the following running subtotals:
|
||||||||||||
| Amount | Displays the amount of the loan proceeds funded by an allocation, the Total Funding Amount, and the Remaining Funding Amount. |
|
When an allocation is added to the loan, it populates in the grid along with a  that allows fund allocations to be deleted. that allows fund allocations to be deleted. |
When a user selects Deposit as the funding option, the Edit Loan Funding - Deposit screen opens in a new window to allow the applicant to allocate loan proceeds directly to their deposit accounts within the institution.
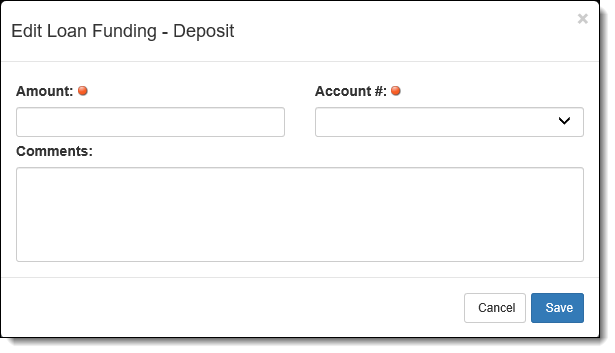
Within the Edit Loan Funding - Deposit screen, the following fields allow users to allocate loan proceeds via deposit:
| Fields | Description | ||||
| Amount | Enter the amount that is to be deposited into the applicant’s account. This field is required. | ||||
| Account # |
From the drop-down list, select the account where the application proceeds are to be deposited. This drop-down list contains the primary applicant's current account products at the institution as well as all account products associated with the application.
|
||||
| Comments | Enter any applicable funding comments. |
Once the deposit allocation has been entered, click  to finalize the deposit allocation selection. Click
  to return to the Loan Funding panel without selecting a deposit allocation.
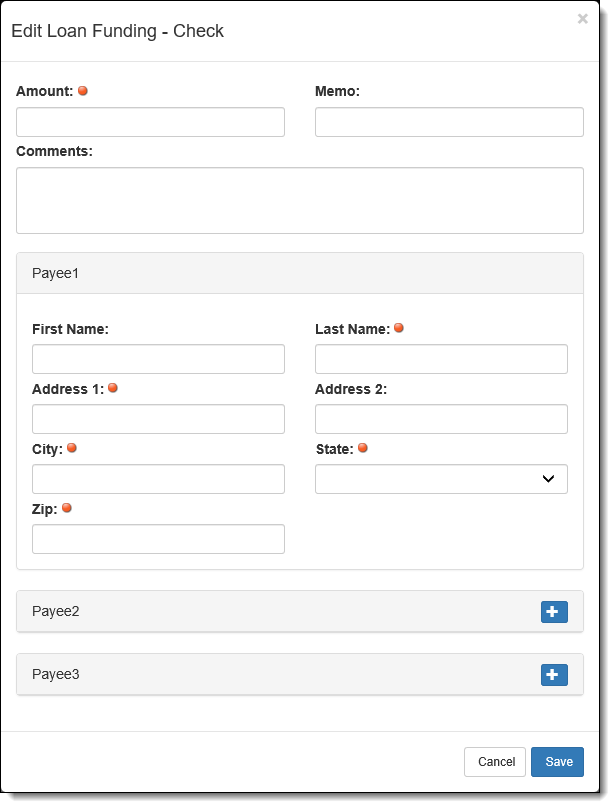
When a user selects Check as a funding option, the Edit Loan Funding - Check screen opens in a new window.

The Edit Loan Funding - Check screen allows users to identify up to three payees, as well as the following check information:
| Field | Description |
| Amount | Enter the value of the check being issued from the loan proceeds. |
| Memo | Enter the memo statement that appears on the check. |
| Comments | Enter any applicable funding comments. |
Once the check information is entered, identify a maximum of three check payees for each check used to fund a loan application. Starting with Payee 1, enter the names of the individuals to appear on the check(s). Each payee panel contains the following fields:
| Field | Description | ||
| First Name | Enter the first name of the check payee. | ||
| Last Name |
Enter the last name of the check payee.
|
||
| Address 1 | Enter the check payee's street address. | ||
| Address 2 | Enter the check payee's street address line 2. | ||
| City | Enter the check payee's city. | ||
| State | Enter the check payee's state. | ||
| Zip | Enter the check payee's postal code. |
|
If multiple payees are added to check, the check is made payable with an OR relationship |
Once the check allocation has been entered, click to finalize the check allocation selection. Click to return to the Loan Funding panel without selecting a check allocation.
When a user selects Check as the funding option, the Edit Loan Funding - Check screen opens in a new window. Within this window, users are able to identify up to three payees, as well as additional check information.
Complete the following fields within the Edit Loan Funding - Check screen:
| Field | Description |
| Account | Enter the value of the check being issued from the loan proceeds. This field is required. |
| Memo | Enter the memo statement that appears on the check. |
| Comment | Enter any applicable funding comments. |
Once the check information is entered, identify a maximum of three payees for each check used to fund a loan application. Starting with Payee 1, enter the names of the individuals to appear on the check(s). Each payee panel contains the following fields:
| Field | Description | ||
| First Name | Enter the first name of the check payee. | ||
| Last Name |
Enter the name of the check payee
|
||
| Address 1 | Enter the check payee’s street address. | ||
| Address 2 | If necessary, enter the check payee's street address line 2. | ||
| City | Enter the check payee's city. | ||
| State | Enter the check payee's state. | ||
| Zip | Enter the check payee's postal code. |
Once the check allocation has been entered, click  to finalize the check allocation selection. Click
  to return to the Loan Funding panel without selecting a check allocation.
...


 Edit Loan Funding - Deposit